(MergerFS + SnapRAID) is the new RAID 5
Home Server Storage Setup with Slack Notifications
Feeling more like watching youtube? Check out my tutorial in video on my youtube channel.
I am travelling a lot, and as you must know, travelling with external hard drives, is heavy, and mostly unsafe. If anything happens to your hard drive, you will lose all your precious travel memories. Google One and its Google Photo app are very good, but you cannot store your videos in full definition, and you have to pay a monthly fee. Not ideal when you want to store a massive quantity of 4K videos.
Because of this, a few years ago I decided to set up my own Home Server, aka NAS. I used old components from my previous PC, and others were found second-hand. I prefer to save my money to travel. 🤑
I use it mainly for storing my photos and video and my files. In this NAS I have one M2 SSD drive for the system and temporary files, and 4 disks of 2TB, in RAID5, which means that I had a failure tolerance of one drive and could use 6TB of storage. This was enough size for my usage, and it was accessible from everywhere, 24/7. The dream.
Until that one day when I could not access it. 🤯
I tried to recover the best I could, but between the fact that 2 drives were down, and LVM on top of it, because of a bad choice made a long time ago. That was impossible.
What probably happened is that one day, a disk silently crashed. I was sure I set up email notifications, but I never received anything about it. The system continued working on 3 disks. Until a few days ago when a second disk crashed, and I lost it all.
Changing the drives
Anyway, it was time for me to grieve my lost data, and be grateful for the few was hanging on another computer or with still copy of it on an SD card.
Then I put everything out and remove the 2 faulty drives. I had 2 x 12TB external hard drive laying around from when mining CHIA was a thing. I decided to use them so this repair will not cost me any additional money.
As you realised by now, I have a heterogenous drive configuration :
2x2TB
2x12TB
We could use it in RAID in a 2xRAID1 configuration, but we will lose half of the drives in capacity.
My thoughs about Raid solutions
On Paper, Raid is a great system for a NAS. We are losing one or 2 drives' capacity, depending if we choose RAID5 or RAID6 in exchange for 1 or 2 drive failure tolerance.
Every time you write a file in a RAID5 Array, every block of it is written in a different drive, with its parity information stored in the parity drive.
Now if like me you are losing 2 drives, well you lose everything.
Well, I assure you that when it is happening to you would love to be able to get back some data from the 2 last disks! Well with RAID you can't. 😑
Then RAID has some annoying limitations when you are on a budget :
Replacing disks is not trivial, you need to put your array in degraded state and rebuild it.
All disks must be the same size or you will just lose space, so an upgrade can be pretty salty. 💸
The solution I choose
And If I was telling you that with two different software, you could have the same level of safety, with more advantages? MergerFS and SnapRAID are not related to each other but are very complementary.
MergerFS
MergerFS is a simple tool that allows you to group your disks and make them appear as one. When you write a file to this group, by default the file is written on the disk with more available space, on all the branches where the relative path exists. I invite you to have a look at the extensive list of policies to find the one that matches the best.
Unlike RAID, the split is not made on the block level, but on the file level. That means that if you lose one disk because it is just temporarily offline, or dead, you still have access to the files that are on the others. When your lost disk is back online, the missing files will magically appear.
There are ways with a bit of scripting, to have an SSD cache of the recently used files (I won't cover this for now).
Downside: that also can bring slower read/write times, because the load is not spread across all the drives.
SnapRAID
SnapRAID allows you to store parity data from other drives, on 1 or 2 drives to have the same disk failure tolerance as RAID 5 or RAID 6
It is stored in files, so if you change of hard drive, you just have to copy these parity files to the new one.
You can exclude some folders if you don't want to generate parity for them.
Downside: The parity is not generated in real-time, you have to run a command to analyse the drives and create the parity data for the files you just added or modified.
By combining these 2, we will have a storage solution, similar to RAID, but that will allow you to recover some data even with more than 2 drives failure. Yes, the parity is not in real-time, so there is a risk that you can lose the files between the moment you add them, and the moment you launch a sync. But my home server is mainly to store non-critical files, not every second, so it will be enough for my usage.
Setting it up on my machine
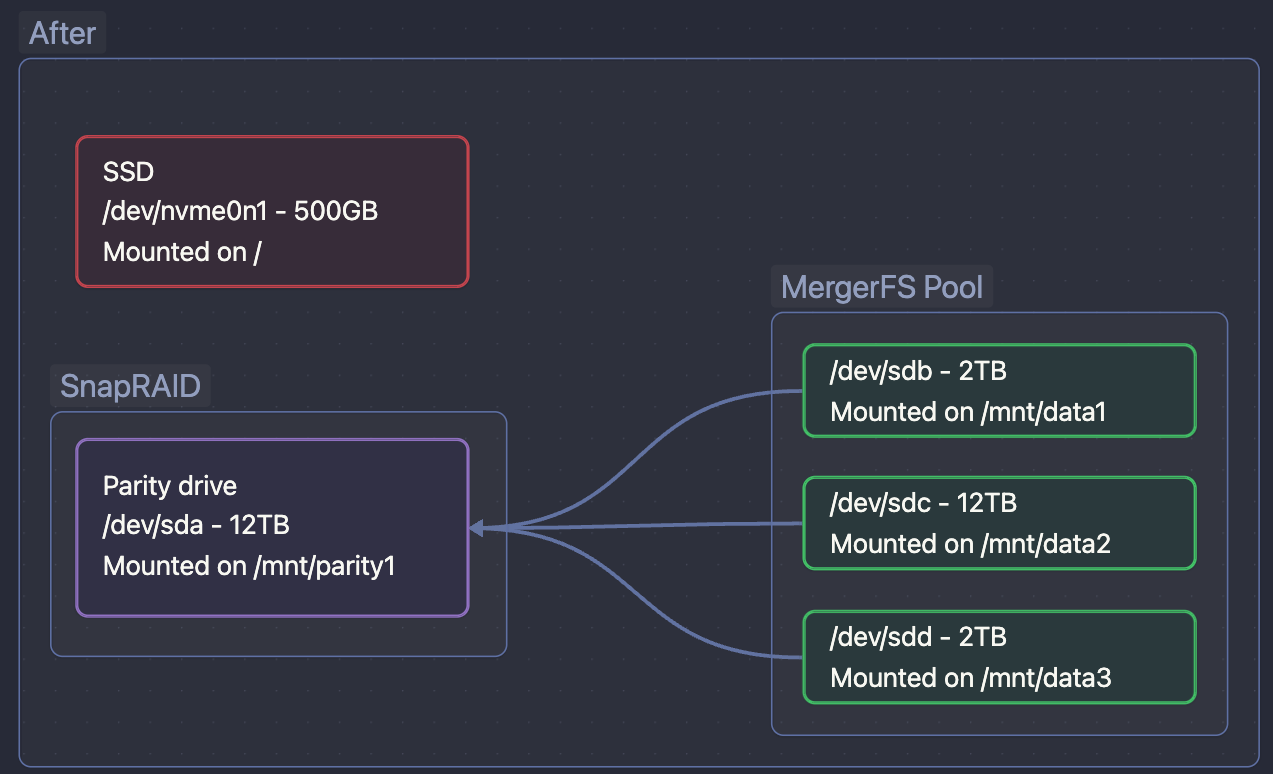
I have 4 drives, 2 x 2TB and 2 x 12 TB. It is recommended to use one of your biggest hard drives for SnapRAID parity data, so I will use one 12TB drive. So I will have :
/mnt/data1
/mnt/data2
/mnt/data3
/mnt/parity1
Formating the drives and mounting them
First, on all the storage drives, we will create a new empty partition with fdisk, and format them in XFS.
# For my first drive
sudo fdisk /dev/sda
# Then use :
# g : Create a new partition table
# n : Create a new partition on your drive
# w : Write the new table on the drive
Start over with all the other drives
Then we format them all
sudo mkfs.xfs /dev/sd{a,b,c,d}1
Then we will format them all :
Then we will print the ids of the different drives with the blkid command. We use these IDs to complete our /etc/fstab file. The goal of it is to mount automatically the drives on startup.
In the end, my /etc/fstab looks like this :
# /etc/fstab: static file system information.
#
# Use 'blkid' to print the universally unique identifier for a
# device; this may be used with UUID= as a more robust way to name devices
# that works even if disks are added and removed. See fstab(5).
#
# <file system> <mount point>   <type>  <options>       <dump>  <pass>
# / was on /dev/nvme0n1p2 during curtin installation
/dev/disk/by-uuid/b9da617f-0084-47ff-93ac-f53f91e8a838 / ext4 defaults 0 1
# /boot/efi was on /dev/nvme0n1p1 during curtin installation
/dev/disk/by-uuid/BFA1-BF33 /boot/efi vfat defaults 0 1
/swap.img    none    swap    sw    0    0

# Data drives
UUID="a7005af1-e11f-4a49-8c32-47a19711d39f"    /mnt/data1    xfs    defaults    0    2
UUID="99322a38-d6e1-45ab-96eb-21c10bbb621d"    /mnt/data2    xfs    defaults    0    2
UUID="eedaa80f-e3a9-4b89-8412-c1eeba7a9077"    /mnt/data3    xfs    defaults    0    2

# Parity drive
UUID="77bbec02-1662-4953-83c3-8f5f7367b1f0"    /mnt/parity1    xfs    defaults    0    2
I save the file and create these folders and mount all the drives at once :
sudo mkdir -p /mnt/data{1,2,3}
sudo mkdir -p /mnt/parity1
sudo mount -a
Ok, we have our drives formatted and mounted!
MergerFS
We install MergerFS with a simple command :
sudo apt install fuse mergerfs # MergerFS rely on fuse
Warning : on my Ubuntu 22.04 LTS, the package version is giving me the resonably outdated version 2.33.3-1 ( Actual version from the Github repo at the moment of writing this post : 2.34.1). If you want the latest bugfixes, install your package from GitHub releases
We go back to our /etc/fstab file and we are creating a new mount.
Here I decided to group all the drives mounted in /mnt/data* and the grouped drive should be accessible under /mnt/pool. As I want the data that I create to be spread across the drives according to their percentage of free space, I choose the pfrd policy. Feel free to choose another (see Policies). For me the line I add looks like this :
#MergerFS
/mnt/data*    /mnt/pool    fuse.mergerfs    allow_other,use_ino,cache.files=partial,dropcacheonclose=true,category.create=pfrd    0    0
We create the directory /mnt/pool and we mount everything again :
sudo mkdir -p /mnt/pool
sudo mount -a
sudo df -h
We check and you will see a new drive appeared, having the cumulated capacity of all the drives in the array! If you create one file in the pool mount, you will see it appear on one of your drives.
Cool no? 😎
SnapRAID
OK. We have one big drive, but not of the data in it is safe from one drive failing.
First, we install SnapRAID easily with :
sudo apt install snapraid
Then we will edit /etc/snapraid.conf If this file does not exist, don't worry, what has to be inside is pretty simple and we can write it ourselves.
We want to specify where to store the parity data.
We want to specify which data disk to use.
We want to give to SnapRAID some content files. The content files are like an index of your data. It does not take that much space, so more won't hurt. You can even add one content file on the boot drive.
You can add exclusions for the folders or files you don't want to have the parity generated, to save resources and space, and sync faster.
Last but not least, a little option I like to add,
autosave 100specify that during a synchronisation, every 100Gb, the state should be saved. In case of a crash, or whatever happens, this will be safe.
My /etc/snapraid.conf look like this at the end:
parity /mnt/parity1/snapraid.parity
data d1 /mnt/data1/
data d2 /mnt/data2/
data d3 /mnt/data3/
content /home/thenomadcode/snapraid.content
content /mnt/data1/.snapraid.content
content /mnt/data2/.snapraid.content
content /mnt/data3/.snapraid.content
exclude /Backup/
exclude /tmp/
exclude *.bak
autosave 100
You can launch your first sync with snapraid sync it is quite fast but it also can take a while depending on how much data you have. When this command completes, your data is now safe 🎉.
Auto sync
Wait a minute, my data is safe now, but if I add or modify my files?
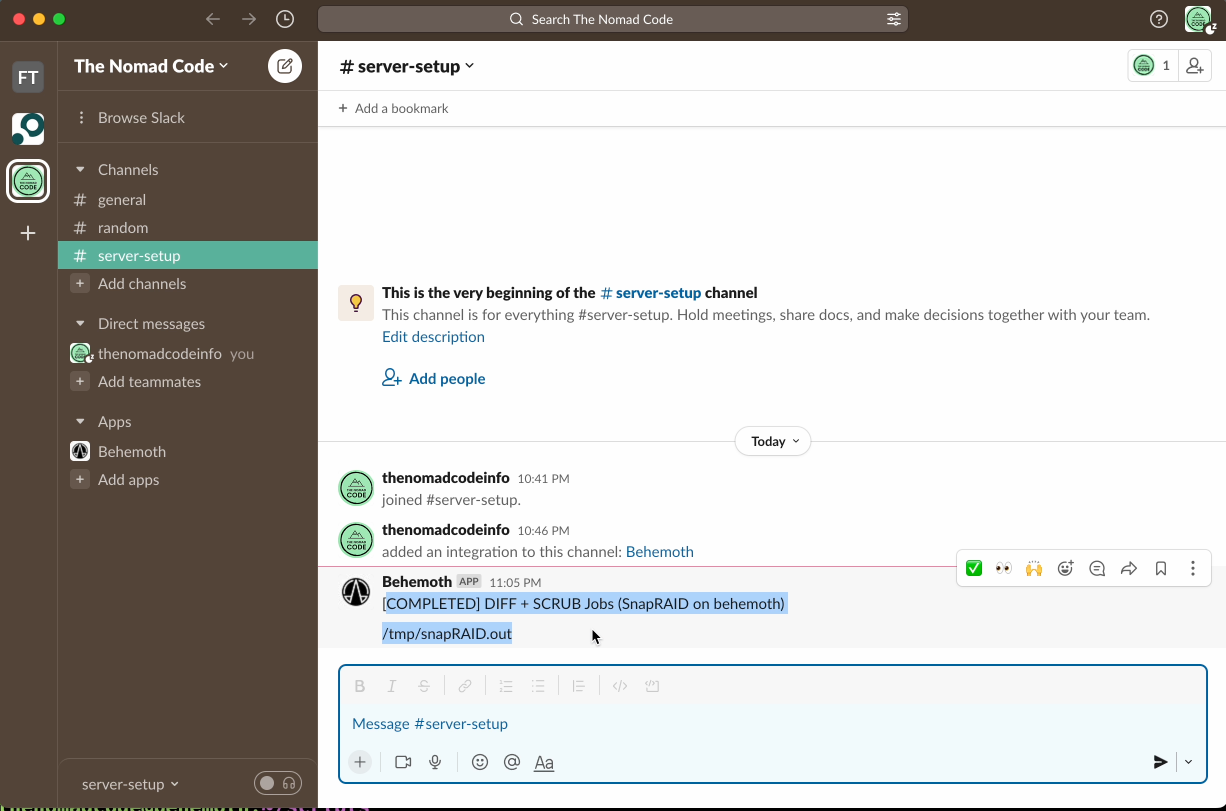
Indeed with snapRAID, nothing is running in the background. You have to launch the process manually. To sync it on regular basis, I used a script inspired by Zack Reed. This script was supposed to send an email when finished with a report.
From experience, email is nice, but it needs a configuration. You need to use a mail provider like Mailchimp or Sendgrid to send your email reliably, or you can also use your own Gmail account with a bit of configuration. Personally, I prefer to have my mailbox as clean as possible, so would prefer another solution: Sending a notification to a Slack channel.
Slack notifications
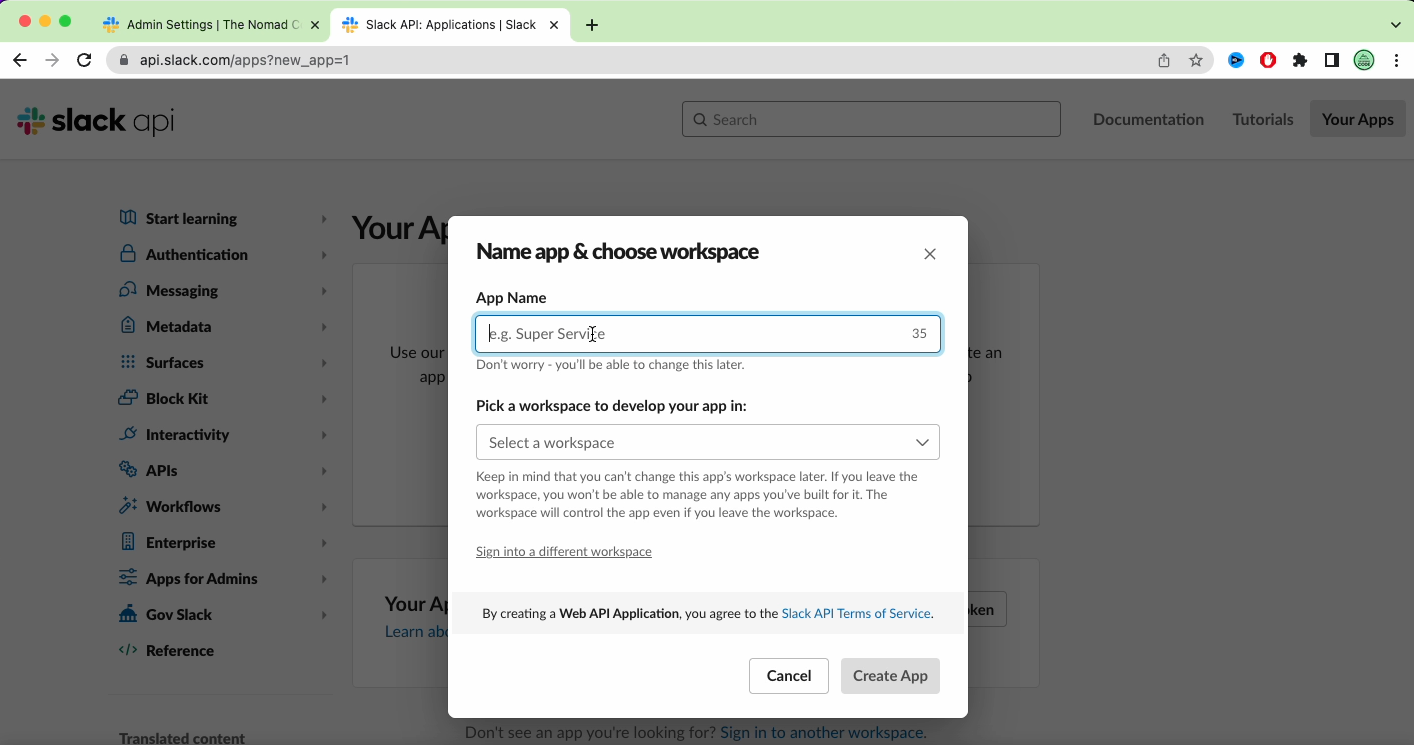
To receive slack notifications, nothing more simple. Go to https://api.slack.com. From there click on "Create a new App". Then choose from scratch, enter a name for it, and a workspace, and click create.
Then to be able to send notifications, go to Incoming Webhook. Active the feature, and click on the "Add a new webhook to your workspace" button. Then grant access for your app to one channel.
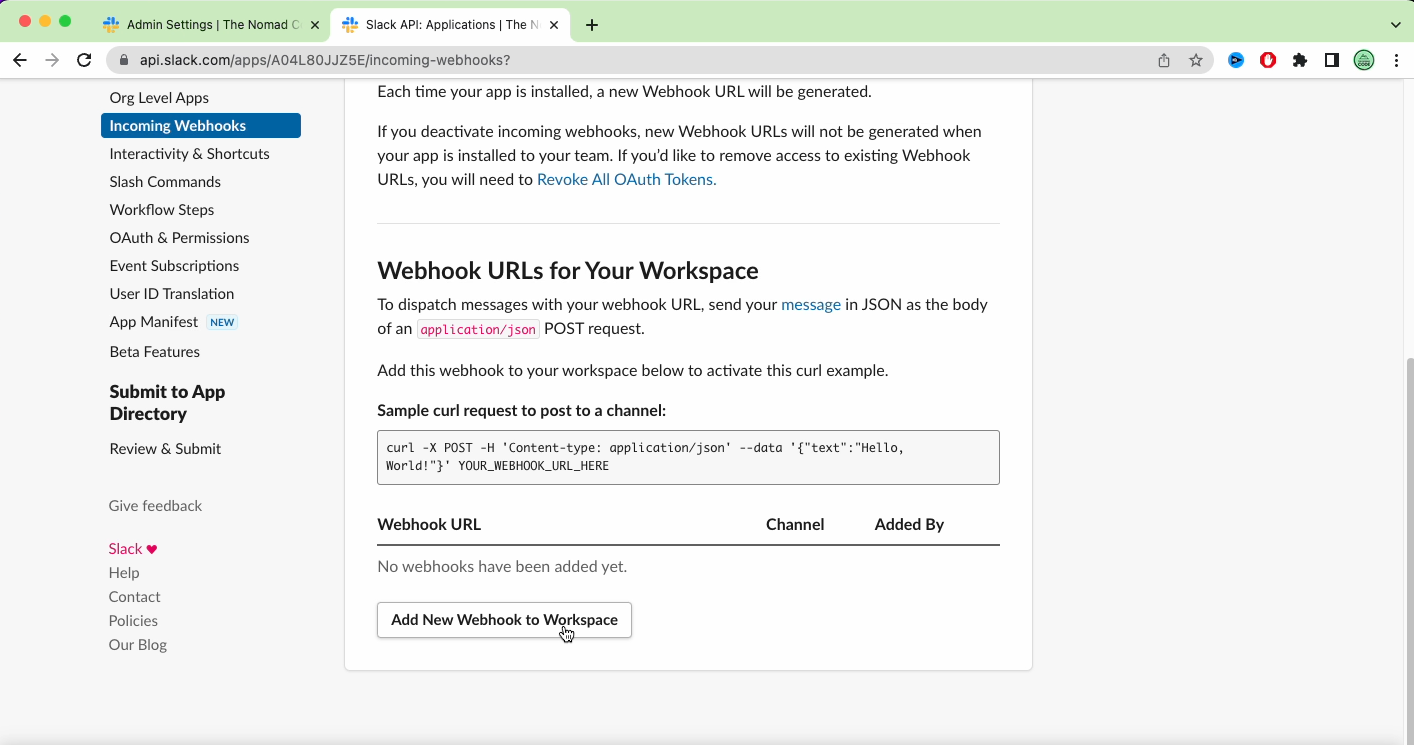
Once this is done, you will be given an example of a webhook that you can call using curl.
If you just copy-paste this into your terminal, you will receive it on slack directly! Perfect! 🔔
Slack is always open because it is the way my main customer decided to work. So I find it handy to be able to receive this notification here. But feel free to use the app you want, Discord or Microsoft Teams (if you are into that) also have a webhooks feature.
Automated parity script
Now that this works, let's copy the script of Zack Reed that you can find here, and adapt it to send slack messages instead. You can find my slack version on my gist right here.
This script has several variables that you can modify to suit your needs better.
The
DEL_THRESHOLDandUP_THRESHOLDwill allow you to track the number of deleted or updated files. If the number of those files is exceeding the threshold numbers, the script will stop and trigger an alert (with slack in my case). This is preventing the script to modify the existing parity in case of accidental deletions of files and can prevent encryption malware that would encrypt all your files. This way you should be able to recover your deleted or modified files to their original state. Set it as you want according to what you consider to be an unusual number.The
SYNC_WARN_THRESHOLDvariable is here to force a synchronisation after a certain amount of warning generated by the Updated/deleted files thresholds. Imagine you are changing a lot of files on purpose and theSYNC_WARN_THRESHOLD=1, you will receive an alert. As you know that you are the one responsible for all these changes, you can just ignore them. The next time the script run, it will sync everything because one warning was already emitted.You can also set up some settings for the scrubbing, so you don't verify all your data each time you run the script, but a percentage of it, thanks to :
SCRUB_PERCENT=20
SCRUB_AGE=10
- Don't forget to set the
SLACK_WEBHOOK_URLto your webhook endpoint :
# Slack
SLACK_WEBHOOK_URL="https://hooks.slack.com/services/XXXXXXXX/XXXXXXX/XXXXXXXXXXXXXXXXXXXXXXX"
Everything set? Good, save the script, and make it executable. Launch it, just to see that everything works fine and that you receive the notification. 🔔
Then you have one last decision to make: when to call this script. Indeed, if you add a new file to your pool, it will be unprotected and you can lose it in case of a failure until the parity synchronisation is done. For my usage, I choose to call it once a night. I set up a cron task for that, and if I add a lot of pictures at once, I call it manually to feel safer.
# m h  dom mon dow   command
0 3 * * * /home/thenomadcode/scripts/snapsync.sh
But you can call it several times a day if you don't have that much data or if you consider that your data is more precious than mine. Your Server, Your Rules. 😎
Conclusion
We have now a real alternative to RAID systems. MergerFS to see all your disks as one, and SnapRAID to handle parity are working seamlessly together. The parity is handled at the file level and not at the block one, and it brings more simplicity.
If tomorrow's drive sizes increase and I want to replace my drives with bigger ones, I will just have to copy content over the new drive and make it mount at the same mount point as the old one. This is a game changer compared to having to put your RAID array in a degraded state, and rebuild it, soliciting heavily CPU and all drives, with the possibility it can create a failure while doing it.
If like me you just use your home server to store files from time to time, movies that you want to watch or content that you can re-download, this is more than enough! If you want to use this in a more intensive context, with a lot of critical files changing all the time that you can't afford to lose, then RAID is still the way to go.
PS: If you want to receive more stories like this, don't hesitate to subscribe to my newsletter or to follow me on twitter